Reverse a Receipt
If the visit details were incorrectly recorded, cancels the payment receipt.
Before you begin
Warning:
- If a patient claim has been submitted, you must complete a same-day delete before you adjust the receipt.
- To reverse the receipt, you must first zero the value of the invoice amount and complete a Did Not Wait or reverse an invoice process. For more information, see Adjust - Item or Amount and Reverse Invoice.
- After you have completed a reverse receipt process, the receipt can no longer be adjusted.
About this task
Procedure
To reverse a receipt:
-
From the
 Patient Search or
  Patient Queue, select a patient.
-
To view a patient's transaction history,
click
 Transaction History in the floating navigation bar. You are
redirected to the Transaction History
panel.
Tip:To minimise the number of transactions on the screen, apply filters such as a date range, reference number or set a status of Receipts. -
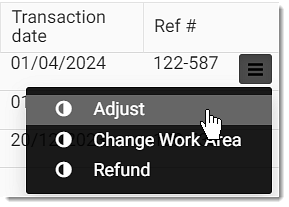
Hover your mouse over the receipt item and click
 Menu.
Menu.
-
From the list, select Adjust.

-
Hover your mouse over the selected receipt item and click
 Delete. No receipt items are displayed for the receipt.
- From the Category list, select an appropriate category for an adjustment.
- In the Reason field, enter a reason for reversing the receipt.
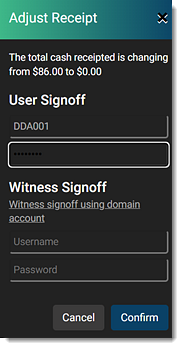
- Click Save. An Adjust Receipt confirmation prompt is displayed.
-
To complete a reverse receipt, enter your credential details:

- In the User Signoff section, enter your username and password.
- In the Witness Signoff section, enter the witness user's username and password and use a domain account.