Send an Email
Compose a letter in the Letter Writer and email it to patients or other health providers.
Before you begin
About this task
Letters emailed to patients can be password protected. However letters emailed to other health providers are not password protected. To email a registered health provider securely, select Secure Message Delivery (SMD).
Procedure
- In the Letter Writer, create the document you want to email. For more information about creating a document, see Write a Letter.
- Click Save and Send.
-
If sending electronically, in the
Send Document window:
- If sending the letter to the patient:
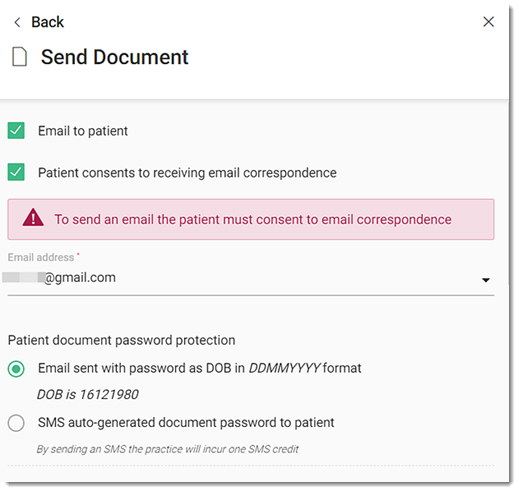
- Set Email to patient.

- If the patient has not yet consented to receiving emails, seek their consent and
set Patient consents to receiving email correspondence.
Consent is added to Patient Preferences automatically.
- In the Email address field, select an email address from
those recorded in the patient's details or enter a valid new email address for the
patient.
To add the new address as one of the two possible email addresses for this patient in patient demographics, set Update patient email. If there is only one address recorded, set Add email to patient file. If there are already two email addresses recorded you cannot save the address you entered.
- Select your preferred password option for document security:
- To use the patient's date of birth as recorded in Helix, set Email sent with password as DOB in DDMMYYYY format.
- To send an automated SMS to the patient separately with a password, set
SMS auto-generated document password to patient and
in the Send to number field:
- Select the patient's mobile number from the list, as recorded in the patient details.
- If the patient's mobile number is not recorded, enter a valid mobile number and set Add mobile number to patient file.
- Set Email to patient.
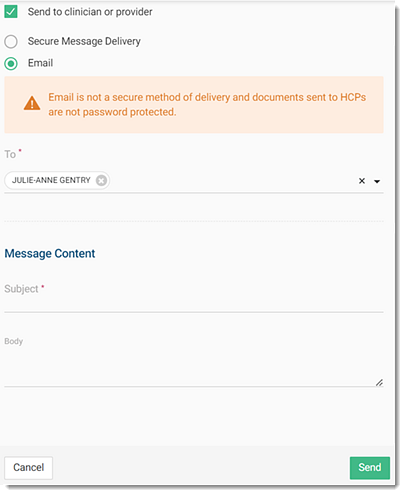
- If sending the letter to a provider, set Send to
clinician or provider and:

- If HealthLink is enabled, select Secure Message Delivery. For more information, see Create and Send Secure Documents.
- If emailing the letter, set Email and
in the To field start typing the recipient and select them
from the list.
If a recipient's details are not recorded in the address book, to add a new recipient, click
 Add new address. For more information, see Add New Addresses.Note:Email is not secure and documents sent via email to HCPs are not password protected.
- If sending the letter to the patient:
- In the Subject field, enter a subject.
- In the Body field, enter a summary.
- To email the document, click Send.
Results
When the consult is ended, a record of the email is also displayed in the patient's Timeline after a short delay before the Timeline. For more information, see Timeline
What to do next
- To print a document, click
 Print.
 - To resend an email to the patient or HCPs, click
 Resend. For more information, see Resend an Email from the Patient's Timeline.
To review the details of a sent email, select . For more information, see Comms Log.
